身份证识别
import pytesseract
import cv2
import matplotlib.pyplot as plt
import dlib
import matplotlib.patches as mpatches
from skimage import io,draw,transform,color
import numpy as np
import pandas as pd
import re

detector = dlib.get_frontal_face_detector()
image = io.imread("img-0.png")
dets = detector(image, 2) #使用detector进行人脸检测 dets为返回的结果
## 将识别的图像可视化
plt.figure()
ax = plt.subplot(111)
# ax.imshow(image)
plt.axis("off")
for i, face in enumerate(dets):
    # 在图片中标注人脸,并显示
    left = face.left()
    top = face.top()
    right = face.right()
    bottom = face.bottom()
    rect = mpatches.Rectangle((left,bottom), right - left, top - bottom,
                                  fill=False, edgecolor='red', linewidth=1)
    ax.add_patch(rect)
plt.show()

predictor = dlib.shape_predictor("shape_predictor_5_face_landmarks.dat")
detected_landmarks = predictor(image, dets[0]).parts()
landmarks = np.array([[p.x, p.y] for p in detected_landmarks])
## 将眼睛位置可视化
# plt.figure()
# ax = plt.subplot(111)
# ax.imshow(image)
# plt.axis("off")
# plt.plot(landmarks[0:4,0],landmarks[0:4,1],'ro')
# for ii in np.arange(4):
#     plt.text(landmarks[ii,0]-10,landmarks[ii,1]-15,ii)
# plt.show()

## 计算眼睛的倾斜角度,逆时针角度
def twopointcor(point1,point2):
    """point1 = (x1,y1),point2 = (x2,y2)"""
    deltxy = point2 - point1
    corner = np.arctan(deltxy[1] / deltxy[0]) * 180 / np.pi
    return corner

## 计算多个角度求均值
corner10 =  twopointcor(landmarks[1,:],landmarks[0,:])
corner23 =  twopointcor(landmarks[3,:],landmarks[2,:])
corner20 =  twopointcor(landmarks[2,:],landmarks[0,:])
corner = np.mean([corner10,corner23,corner20])
# print(corner10)
# print(corner23)
# print(corner20)
# print(corner)

## 计算图像的身份证倾斜的角度
def IDcorner(landmarks):
    """landmarks:检测的人脸5个特征点
       经过测试使用第0个和第2个特征点计算角度较合适
    """
    corner20 =  twopointcor(landmarks[2,:],landmarks[0,:])
    corner = np.mean([corner20])
    return corner
corner = IDcorner(landmarks)
# print(corner)

## 将照片转正
def rotateIdcard(image):
    "image :需要处理的图像"
    ## 使用dlib.get_frontal_face_detector识别人脸
    detector = dlib.get_frontal_face_detector()
    dets = detector(image, 2) #使用detector进行人脸检测 dets为返回的结果
    ## 检测人脸的眼睛所在位置
    predictor = dlib.shape_predictor("shape_predictor_5_face_landmarks.dat")
    detected_landmarks = predictor(image, dets[0]).parts()
    landmarks = np.array([[p.x, p.y] for p in detected_landmarks])
    corner = IDcorner(landmarks)
    ## 旋转后的图像
    image2 = transform.rotate(image,corner,clip=False)
    image2 = np.uint8(image2*255)
    ## 旋转后人脸位置
    det = detector(image2, 2)
    return image2,det

## 转正身份证:
image = io.imread("img-0.png")
image2,dets = rotateIdcard(image)

## 可视化修正后的结果
plt.figure()
ax = plt.subplot(111)
# ax.imshow(image2)
plt.axis("off")
# 在图片中标注人脸,并显示
left = dets[0].left()
top = dets[0].top()
right = dets[0].right()
bottom = dets[0].bottom()
rect = mpatches.Rectangle((left,bottom), (right - left), (top - bottom),
                          fill=False, edgecolor='red', linewidth=1)
ax.add_patch(rect)

## 照片的位置(不怎么精确)
width = right - left
high = top - bottom
left2 = np.uint(left - 0.5*width)
bottom2 = np.uint(bottom + 0.5*width)
rect = mpatches.Rectangle((left2,bottom2), 1.8*width, 2.2*high,
                          fill=False, edgecolor='blue', linewidth=1)
ax.add_patch(rect)
plt.show()

## 身份证上人的照片
top2 = np.uint(bottom2+2.2*high)
right2 = np.uint(left2+1.8*width)
image3 = image2[top2:bottom2,left2:right2,:]
# plt.imshow(image3)
plt.axis("off")
plt.show()
# cv2.imshow('image3',image3)
# cv2.waitKey()

# ## 对图像进行处理,转化为灰度图像=>二值图像
# imagegray = cv2.cvtColor(image2,cv2.COLOR_RGB2GRAY)
# cv2.imshow('imagegray',imagegray)
#
# cv2.waitKey()
# retval, imagebin = cv2.threshold(imagegray, 120, 255, cv2.THRESH_OTSU + cv2.THRESH_binary)
# ## 将照片去除
# imagebin[0:bottom2,left2:-1] = 255
# # 高斯双边滤波
# img_bilateralFilter = cv2.bilateralFilter(imagebin, 40, 75, 75)
#
# cv2.imshow('img_bilateralFilter',img_bilateralFilter)
# cv2.waitKey()
# # plt.imshow(img_bilateralFilter,cmap=plt.cm.gray)
# #
# # plt.axis("off")
# # plt.show()


img=cv2.imread('img-0.png') #打开图片
gray=cv2.cvtColor(image2,cv2.COLOR_BGR2GRAY) #灰度处理
# cv2.imshow('gray', gray)
retval, imagebin = cv2.threshold(gray, 50, 255, cv2.THRESH_OTSU + cv2.THRESH_BINARY)
## 将照片去除
imagebin[0:bottom2,left2:-1] = 255
img_bilateralFilter = cv2.bilateralFilter(imagebin, 40, 100, 100) # 高斯双边滤波

cv2.namedWindow("img_bilateralFilter", cv2.WINDOW_NORMAL)
cv2.imshow('img_bilateralFilter', img_bilateralFilter)

cv2.waitKey(0)
本文章主要利用pytesseract,dlib,OpenCV3等库提取身份证上的信息,主要分为文字信息和照片信息。首先加载所需要的库:
%matplotlib inline
%config InlineBackend.figure_format = 'retina'
import pytesseract
import cv2
import matplotlib.pyplot as plt
import dlib
import matplotlib.patches as mpatches
from skimage import io,draw,transform,color
import numpy as np
import pandas as pd
import re
针对所需要识别的身份证照片,可能会存在身份证图像倾斜的情况,所以要对照片进行旋转修正。主要通过dlib库识别人脸,找到人脸眼睛特征点,计算眼睛的倾斜角度,然后对照片进行旋转。
## 使用dlib.get_frontal_face_detector识别人脸
detector = dlib.get_frontal_face_detector()
image = io.imread("奥巴马2.jpeg")
dets = detector(image, 2) #使用detector进行人脸检测 dets为返回的结果
## 将识别的图像可视化
plt.figure()
ax = plt.subplot(111)
ax.imshow(image)
plt.axis("off")
for i, face in enumerate(dets):
    # 在图片中标注人脸,并显示
    left = face.left()
    top = face.top()
    right = face.right()
    bottom = face.bottom()
    rect = mpatches.Rectangle((left,bottom), right - left, top - bottom,
                                  fill=False, edgecolor='red', linewidth=1)
    ax.add_patch(rect)
plt.show()
得到的结果如下:
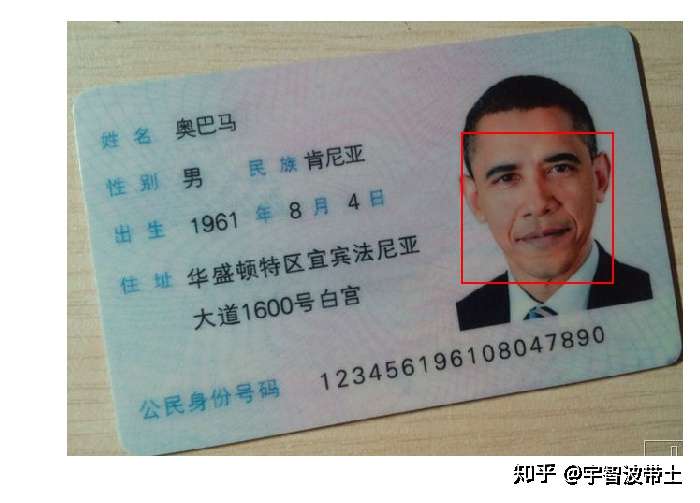
找到人脸后,寻找眼睛特征点:
## 检测人脸的眼睛所在位置
predictor = dlib.shape_predictor("shape_predictor_5_face_landmarks.dat")
detected_landmarks = predictor(image, dets[0]).parts()
landmarks = np.array([[p.x, p.y] for p in detected_landmarks])
## 将眼睛位置可视化
plt.figure()
ax = plt.subplot(111)
ax.imshow(image)
plt.axis("off")
plt.plot(landmarks[0:4,0],landmarks[0:4,1],'ro')
for ii in np.arange(4):
    plt.text(landmarks[ii,0]-10,landmarks[ii,1]-15,ii)
plt.show()
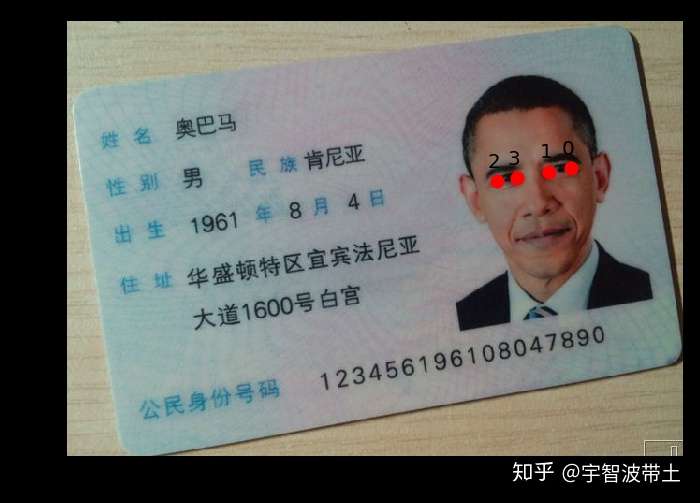
可以发现有四个特征点被找到,计算特征点之间逆时针旋转的倾斜角度:
## 计算眼睛的倾斜角度,逆时针角度
def twopointcor(point1,point2):
    """point1 = (x1,y1),point2 = (x2,y2)"""
    deltxy = point2 - point1
    corner = np.arctan(deltxy[1] / deltxy[0]) * 180 / np.pi
    return corner

## 计算多个角度求均值
corner10 =  twopointcor(landmarks[1,:],landmarks[0,:])
corner23 =  twopointcor(landmarks[3,:],landmarks[2,:])
corner20 =  twopointcor(landmarks[2,:],landmarks[0,:])
corner = np.mean([corner10,corner23,corner20])
print(corner10)
print(corner23)
print(corner20)
print(corner)

-9.865806943084369
-7.765166018425334
-10.049348588124873
-9.226773849878192
经过验证,计算第2个和第0个特征点的倾斜较合适。
## 计算图像的身份证倾斜的角度
def IDcorner(landmarks):
    """landmarks:检测的人脸5个特征点
       经过测试使用第0个和第2个特征点计算角度较合适
    """
    corner20 =  twopointcor(landmarks[2,:],landmarks[0,:])
    corner = np.mean([corner20])
    return corner
corner = IDcorner(landmarks)
print(corner)


-10.049348588124873
接下来是将照片旋转:
## 将照片转正
def rotateIdcard(image):
    "image :需要处理的图像"
    ## 使用dlib.get_frontal_face_detector识别人脸
    detector = dlib.get_frontal_face_detector()
    dets = detector(image, 2) #使用detector进行人脸检测 dets为返回的结果
    ## 检测人脸的眼睛所在位置
    predictor = dlib.shape_predictor("shape_predictor_5_face_landmarks.dat")
    detected_landmarks = predictor(image, dets[0]).parts()
    landmarks = np.array([[p.x, p.y] for p in detected_landmarks])
    corner = IDcorner(landmarks)
    ## 旋转后的图像
    image2 = transform.rotate(image,corner,clip=False)
    image2 = np.uint8(image2*255)
    ## 旋转后人脸位置
    det = detector(image2, 2)
    return image2,det
定义好函数后,下面开始调用,并可视化结果:
## 转正身份证:
image = io.imread("奥巴马2.jpeg")
image2,dets = rotateIdcard(image)

## 可视化修正后的结果
plt.figure()
ax = plt.subplot(111)
ax.imshow(image2)
plt.axis("off")
# 在图片中标注人脸,并显示
left = dets[0].left()
top = dets[0].top()
right = dets[0].right()
bottom = dets[0].bottom()
rect = mpatches.Rectangle((left,bottom), (right - left), (top - bottom),
                          fill=False, edgecolor='red', linewidth=1)
ax.add_patch(rect)

## 照片的位置(不怎么精确)
width = right - left
high = top - bottom
left2 = np.uint(left - 0.3*width)
bottom2 = np.uint(bottom + 0.4*width)
rect = mpatches.Rectangle((left2,bottom2), 1.6*width, 1.8*high,
                          fill=False, edgecolor='blue', linewidth=1)
ax.add_patch(rect)
plt.show()
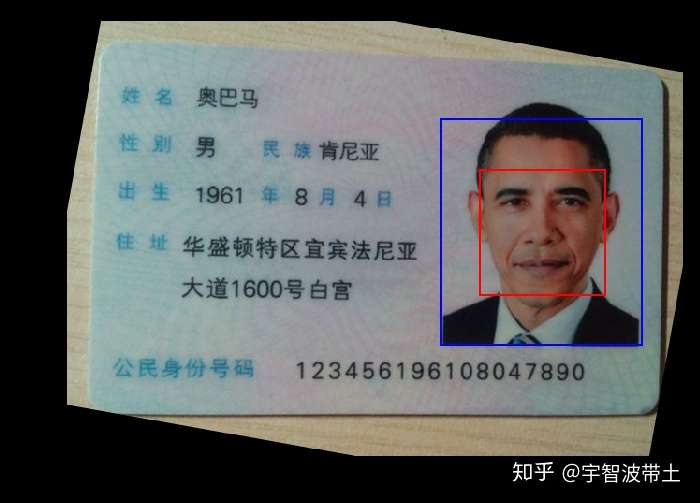
提取照片上的头像:
## 身份证上人的照片
top2 = np.uint(bottom2+1.8*high)
right2 = np.uint(left2+1.6*width)
image3 = image2[top2:bottom2,left2:right2,:]
plt.imshow(image3)
plt.axis("off")
plt.show()
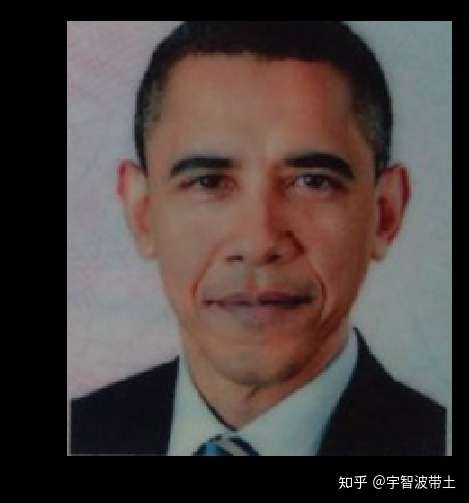
身份证经过转正后,下面通过pytesseract库直接识别上面的文字信息,查看效果:
## 可以通过pytesseract库来查看检测效果,但是结果并不是很好
text = pytesseract.image_to_string(image2,lang='chi_sim')
print(text)

町名 奥巴马

懂趴男 炅濂肯尼亚
瑙藿 1961篆8坷 4H


‖ 刚 华盛顿特区宜宾法尼亚
大道160o号白官

_二 薹

俭民鼻份号蝎 1 234561 961 08047890
结果不是很好,主要原因是干扰信息太多,而且包含两种大小不同的字体,下面将图像转化为二值图像,再次识别:
## 对图像进行处理,转化为灰度图像=>二值图像
imagegray = cv2.cvtColor(image2,cv2.COLOR_RGB2GRAY)
retval, imagebin = cv2.threshold(imagegray, 120, 255, cv2.THRESH_OTSU + cv2.THRESH_BINARY)
## 将照片去除
imagebin[0:bottom2,left2:-1] = 255
plt.imshow(imagebin,cmap=plt.cm.gray)
plt.axis("off")
plt.show()

## 再次通过pytesseract库来查看检测效果,但是结果并不是很好
text = pytesseract.image_to_string(imagebin,lang='chi_sim')
print(text)


奥巴马
男 「 肯尼亚
1961 8 4)

华盛顿特区宜宾法尼亚
大道1600号白宫

1 234561 961 08047890

`
这次的识别效果好很多,对识别结果进行处理:
textlist = text.split("\n")
textdf = pd.DataFrame({"text":textlist})
textdf["textlen"] = textdf.text.APPly(len)
## 去除长度《=1的行
textdf = textdf[textdf.textlen > 1].reset_index(drop = True)
textdf


        text	                 textlen
0	奥巴马	                    3
1	男 「 肯尼亚	            7
2	1961 8 4)	            9
3	华盛顿特区宜宾法尼亚	    10
4	大道1600号白宫	            9
5	1 234561 961 08047890	    21
提取更详细的信息:
## 提取相应的信息
print("姓名:",textdf.text[0])
print("=====================")
print("性别:",textdf.text[1].split(" ")[0])
print("=====================")
print("民族:",textdf.text[1].split(" ")[-1])
print("=====================")
yearnum = textdf.text[2].split(" ")[0]  ## 提取数字
yearnum = re.findall("\d+",yearnum)[0]
print("出生年:",yearnum)
print("=====================")
monthnum = textdf.text[2].split(" ")[1]  ## 提取数字
monthnum = re.findall("\d+",monthnum)[0]
print("出生月:",monthnum)
print("=====================")
daynum = textdf.text[2].split(" ")[2]  ## 提取数字
daynum = re.findall("\d+",daynum)[0]
print("出生日:",daynum)
print("=====================")
IDnum = textdf.text.values[-1]
if (len(IDnum) > 18):   ## 去除不必要的空格
    IDnum = IDnum.replace(" ","")
print("公民身份证号:",IDnum)
print("=====================")
## 获取地址,因为地址可能会是多行
desstext = textdf.text.values[3:(textdf.shape[0] - 1)]
print("地址:","".join(desstext))
print("=====================")


姓名: 奥巴马
=====================
性别: 男
=====================
民族: 肯尼亚
=====================
出生年: 1961
=====================
出生月: 8
=====================
出生日: 4
=====================
公民身份证号: 123456196108047890
=====================
地址: 华盛顿特区宜宾法尼亚大道1600号白宫
=====================
对整个提取信息过程定义一个函数
## 定义身份证识别函数
def Idcard_im2str(image,threshod = 120):
    ## 转正身份证:
    image2,dets = rotateIdcard(image)
    ## 提取照片的头像
    # 在图片中标注人脸,并显示
    left = dets[0].left()
    top = dets[0].top()
    right = dets[0].right()
    bottom = dets[0].bottom()
    ## 照片的位置(不怎么精确)
    width = right - left
    high = top - bottom
    left2 = np.uint(left - 0.3*width)
    bottom2 = np.uint(bottom + 0.4*width)
    ## 身份证上人的照片
    top2 = np.uint(bottom2+1.8*high)
    right2 = np.uint(left2+1.6*width)
    ## [(left2,bottom2),(top2,right2)]
    rectangle = [(left2,bottom2),(top2,right2)]
    imageperson = image2[top2:bottom2,left2:right2,:]
    ## 对图像进行处理,转化为灰度图像=>二值图像
    imagegray = cv2.cvtColor(image2,cv2.COLOR_RGB2GRAY)
    retval, imagebin = cv2.threshold(imagegray, threshod, 255, cv2.THRESH_OTSU + cv2.THRESH_BINARY)
    ## 将照片去除
    imagebin[0:bottom2,left2:-1] = 255
    ## 通过pytesseract库来查看检测效果,但是结果并不是很好
    text = pytesseract.image_to_string(imagebin,lang='chi_sim')
    textlist = text.split("\n")
    textdf = pd.DataFrame({"text":textlist})
    textdf["textlen"] = textdf.text.apply(len)
    ## 去除长度《=1的行
    textdf = textdf[textdf.textlen > 1].reset_index(drop = True)
    return image2,dets,rectangle,imagebin,textdf
调用函数,察看结果:
## 识别身份证的信息
image = io.imread("奥巴马2.jpeg")
image2,dets,rectangle,imagebin,textdf = Idcard_im2str(image,threshod = 120)

## 提取相应的信息
print("姓名:",textdf.text[0])
print("=====================")
print("性别:",textdf.text[1].split(" ")[0])
print("=====================")
print("民族:",textdf.text[1].split(" ")[-1])
print("=====================")
yearnum = textdf.text[2].split(" ")[0]  ## 提取数字
yearnum = re.findall("\d+",yearnum)[0]
print("出生年:",yearnum)
print("=====================")
monthnum = textdf.text[2].split(" ")[1]  ## 提取数字
monthnum = re.findall("\d+",monthnum)[0]
print("出生月:",monthnum)
print("=====================")
daynum = textdf.text[2].split(" ")[2]  ## 提取数字
daynum = re.findall("\d+",daynum)[0]
print("出生日:",daynum)
print("=====================")
IDnum = textdf.text.values[-1]
if (len(IDnum) > 18):   ## 去除不必要的空格
    IDnum = IDnum.replace(" ","")
print("公民身份证号:",IDnum)
print("=====================")
## 获取地址,因为地址可能会是多行
desstext = textdf.text.values[3:(textdf.shape[0] - 1)]
print("地址:","".join(desstext))
print("=====================")

姓名: 奥巴马
=====================
性别: 男
=====================
民族: 肯尼亚
=====================
出生年: 1961
=====================
出生月: 8
=====================
出生日: 4
=====================
公民身份证号: 123456196108047890
=====================
地址: 华盛顿特区宜宾法尼亚大道1600号白宫
=====================
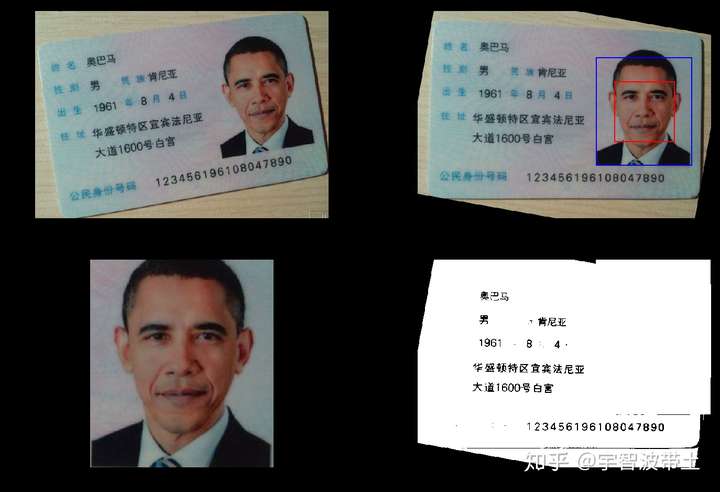
将识别的过程可视化:
## 对识别的信息进行可视化查看
plt.figure(figsize=(12,8))
## 原始图像
plt.subplot(2,2,1)
plt.imshow(image)
plt.axis("off")
## 修正后图像
ax = plt.subplot(2,2,2)
ax.imshow(image2)
plt.axis("off")
# 在图片中标注人脸,并显示
left = dets[0].left()
top = dets[0].top()
right = dets[0].right()
bottom = dets[0].bottom()
rect = mpatches.Rectangle((left,bottom), (right - left), (top - bottom),
                          fill=False, edgecolor='red', linewidth=1)
ax.add_patch(rect)

## 照片的位置(不怎么精确)rectangle = [(left2,bottom2),(top2,right2)]
width = rectangle[1][1] - rectangle[0][0]
high = rectangle[1][0] - rectangle[0][1]
left2 = rectangle[0][0]
bottom2 = rectangle[0][1]
rect = mpatches.Rectangle((left2,bottom2), width, high,
                          fill=False, edgecolor='blue', linewidth=1)
ax.add_patch(rect)

## 显示人的头像
plt.subplot(2,2,3)
## 身份证上人的照片
top2 = bottom2+high
right2 = left2+width
image3 = image2[top2:bottom2,left2:right2,:]
plt.imshow(image3)
plt.axis("off")
## 显示而值化图像
plt.subplot(2,2,4)
plt.imshow(imagebin,cmap=plt.cm.gray)
plt.axis("off")
plt.show()
相关阅读
ShareSDK丨ShareSDK基本设置、QQ登陆、获取QQ用户信息
因为ShareSDK的功能众多,因此我将一条一条的实现每个功能,并将操作步骤记录下来。 ShareSDK基本设置:见下方“3、操作步骤”——2)~4)
转自 https://segmentfault.com/预备知识在了解wraps修饰器之前,我们首先要了解partial和update_wrapper这两个函数,因为在wraps的
一 程序的stdin,stdout,stderr+redirect+pipe程序的stdin,stdout,stderr:通常地一个应用程序默认地连接有3个io流,分别为stdin标准输入
开发的平台中涉及到读取身份证信息,采用的是神思第二代身份证验证系统。 一、下载驱动 本设备型号:SS628(100) 神思官网下载相应的
一、python gui(图形化)常用模块介绍: Tkinter :是python最简单的图形化模块,总共只有14种组建,(也叫Tk接口)是Tk图形用户界面工具包标准